Recursion
Pieces of this lab are based on problems written by Dominique Thiebaut at Smith College, and it was adapted for this course in June 2018 by R. Jordan Crouser, and updated by Alicia M. Grubb in Spring 2019/20.*
Repeat Warning
In order to be sucessful in computer science, an important skill that you must develop is understanding how to implement and develop a specification, and knowing when you can take liberty with the specification. You also need to distingush between implementing and developing a specification. In the course work for CSC111, we ask for some things very precisely. It is important that you read every word of lab and assignment descriptions. Misreading or ignoring directions will result in incorrect software/code.
In this lab, we’ll explore the fundamental programming concept of recursion, a method of solving a problem where the solution depends on solutions to smaller instances of the same problem.
Step 1: A First Look at Recursion
We’ll start with a simple example of recursion with which you are already familiar: finding the factorial of a given number.
Recall from class:
1! = 1      =       1
2! = 2 * 1! =     2*1
3! = 3 * 2! =   3*2*1
4! = 4 * 3! = 4*3*2*1
As a general solution, we can write factorial like this:
\[n! = n * (n-1) * ... * 2 * 1\] Looking at this a little more carefully, we can see that finding the value of \(n!\) is the same as finding the value of \((n-1)!\) and then multiplying it by \(n\):
\[n! = n*\left((n-1)*...*2*1\right)=n*(n-1)!\] Similarly, \((n-1)!\) is the same as finding the value of \((n-2)!\) and then multiplying it by \((n-1)\), and so on. This is a perfect occasion to use recursion!
If we think of this in terms of python functions, factorial(n) is equal to the n * factorial(n-1).
To see how this works in code, copy the following program into a file called factorial.py:
# factorial.py
# Demonstrates a recursive factorial function
def factorial( n ):
  # stopping condition
  if n <= 1:
    return 1

  # recursive step
  return n * factorial(n - 1)


def main():
  n = int( input( "Enter a positive number: " ) )
  x = factorial(n)
  print( "{0:3}! = {1:20}".format( n , x ) )

main()
Based on the problem you solved above you found that n! = n * (n-1)!. We defined the factorial function so that it takes an argument n and returns the value n!.
Identify base case(s):
factorial(1) = 1
Recursive case:
You figured out the general way factorial can be expressed is:
factorial(n) = n * factorialfact(n-1)
So we can almost directly translate the above into python as:
def factorial(n):
    if n <= 1:
        return 1
    else:
        return n * fact(n-1)
Now try running main (above). Recommendation: start with a value < 15.
Check to ensure that it returns the correct result. Here are a few values with which you can compare:
 1! = 1
 2! = 2
 3! = 6
 4! = 24
 5! = 120
 6! = 720
 7! = 5040
 8! = 40320
 9! = 362880
10! = 3628800
11! = 39916800
12! = 479001600
13! = 6227020800
14! = 87178291200
What happens if you try to run it again with 1000 as the input?
Hmm… you probably get an Exception, the end of which looks something like this:

Unfortunately, one downside of recursion is that the system has to keep track of all those intermediate results so that it can combine them in the end. To avoid letting a runaway recursive process hijack your computer, the system limits the number of recursive calls that can be made at once (the “recursion depth”).
Modify the main() function in factorial.py so that instead of asking the user for input, it loops over all values from 1 to 1000 and calculates the factorial(...) for each.
Use the time module as shown below to calculate how long each call takes, and note which value finally causes a RecursionError.
import time
# time how long it takes fact(15) to run
t0 = time.perf_counter()
fact(100)
t1 = time.perf_counter()
print("{0:0.4f} seconds".format(t1-t0))
Surprise, surprise… if we just ask politely, Python will tell us the maximum recursion depth without us having to guess:
import sys
sys.getrecursionlimit()
Is this about the same as where your program crashed?
Begin by downloading the short answer starter file (click this link), and save it locally. Open the file with either Thonny or a text editor. Answer the following short answer question (1-2 English sentences.):
- SA Question #1: Which value cause the recursion error?
- SA Question #2: How long did the previous call take?
Step 2: Multiple recursive calls
In the previous example, each partial solution built linearly on the previous one. However, there’s no requirement that this be the case!
Let’s consider another (possibly) familiar example, the Fibonacci numbers:
\[1, 1, 2, 3, 5, 8, 13, 21, 34, 55, 89, 144, 233, 377, 610, ...\]
Do you see the pattern? Let’s write it out another way:
 fibonacci(1): 1
 fibonacci(2): 1
 fibonacci(3): 2 = 1 + 1
 fibonacci(4): 3 = 1 + 2
 fibonacci(5): 5 = 2 + 3
 fibonacci(6): 8 = 3 + 5
 fibonacci(7): 13 = 5 + 8
 fibonacci(8): 21 = 8 + 13
 fibonacci(9): 34 = 13 + 21
fibonacci(10): 55 = 21 + 34
fibonacci(11): 89 = 34 + 55
fibonacci(12): 144 = 55 + 89
fibonacci(13): 233 = 89 + 144
fibonacci(14): 377 = 144 + 233
fibonacci(15): 610 = 233 + 377
What is the mathematical expressions for fibonacci numbers?
fibonacci(n) = fibonacci(n - 1) + fibonacci(n - 2)
You are going to write a function to calculate fibonacci recursively.
- What is the base case?
- What is the recursive case?
Create a new file/document in Thonny and save it locally with the file name lab6p1.py. Add the course header with the relevant information.
Implement a function called fibonacci(n) that takes an integer n as input and returns the \(n^{th}\) Fibonacci number. Demonstrate that it works by calling it inside a loop in your main() function to print the first 15 Fibonacci numbers, checking above to ensure that your computation is correct.
Note: There are many ways to calculate Fibonacci numbers, but for now you MUST implement the fibonacci(n) function using recursion.
Step 3: Recursion in Nature
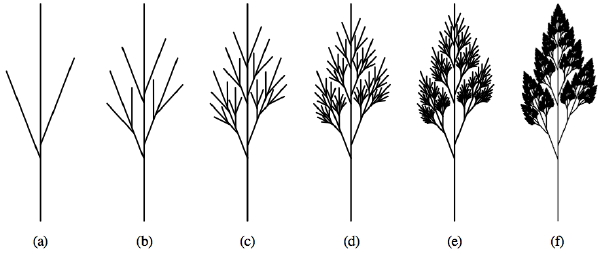
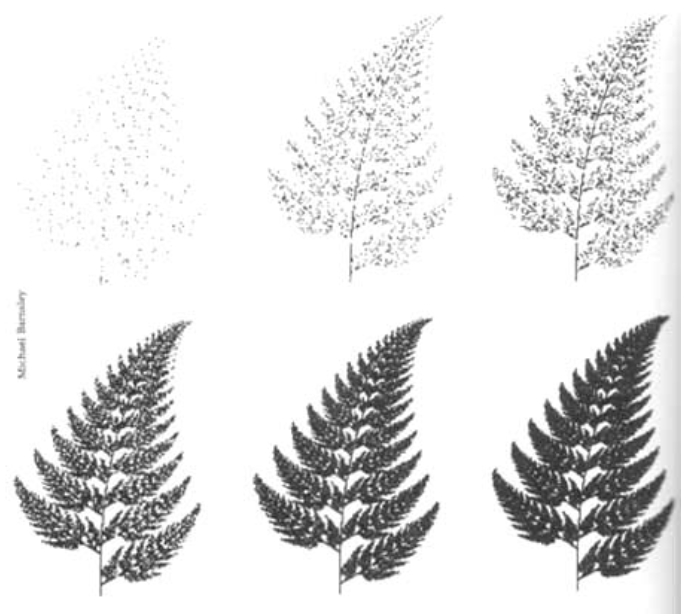
Numerical calculation isn’t the one place where recursion shows up. In fact, there are numerous examples in the natural world you may already know:


These examples of visual recursion are a little bit different in that we are replicating differently-sized copies of the same thing, and arranging them in a particular way (rather than using their results to calculate the next step). However, the concept is the same.
Answer the following question in your lab6SA.txt file:
- SA Question #3: What recursion have you seen in the real world? Can you think of a different example than provided above?
Let’s have a little fun with some visual recursion of our own!
Step 4: Drawing Fractals with Turtle Graphics
The turtle module provides some basic tools for drawing lines on the screen in an animated way. If you’re not familiar with the early history of computer graphics, you can read more here.

The turtle has three attributes: a location, an orientation (or direction), and a pen. The pen has attributes as well: color, width, and on/off state.
We can think of drawing a picture as telling the turtle to walk around the page, turning the pen to the on state when we want the turtle to draw and off when we just need to reposition the turtle. Make sense?
Create a new file/document in Thonny and save it locally with the file name lab6p2.py. Add the course header with the relevant information.
Here’s how the basic setup for using the turtle module (Note: NEVER save your program as turtle.py; if you do, python will assume you want to import that file instead of the actual turtle module!):
import turtle
# Set things up
fred = turtle.Turtle()    # We'll call the Turtle Fred, seems like a nice name
window = turtle.Screen()
This isn’t particularly interesting, because we haven’t asked Fred to move anywhere and so he’s just sitting in the middle of the screen facing to the right.
Lets change that:
import turtle
# Set things up
fred = turtle.Turtle()
window = turtle.Screen()
# Draw a line 150 pixels long
fred.backward(150)
Look at that, he drew a line! All he knows how to do is move forward, backward and turn left and right, but we can use that to get him to draw a circle:
import turtle
# Set things up
fred = turtle.Turtle()
window = turtle.Screen()
# Draw a circle
for i in range(360):
    fred.forward(1)  # Take 1 step forward
    fred.right(1)    # Turn 1 degree to the right
Before we build a recursive function, let’s learn a bit more about Turtle graphics, since you will use this in your homework. All functions available as part of the turtle library are available at https://docs.python.org/3/library/turtle.html. Please take a few minutes to review this page before proceeding.
We can change the color of our turtle fred using the color command:
fred.color("blue")
We can build a house with a floating roof as follows code:
def drawHouse(my_turtle):
    # Stop Drawing!
    my_turtle.penup()
    # Print the original position of the turtle.
    orgPosition = my_turtle.position()
    orgHeading = my_turtle.heading()
    print(orgPosition)
    # Set the (x,y) coordinate of the turtle.
    my_turtle.setposition(25,30)
    # Point my turtle toward North.
    my_turtle.setheading(90)
    # Draw Box for house.
    my_turtle.pendown()
    my_turtle.forward(120)
    my_turtle.right(90) #Turn right 90 degrees.
    my_turtle.forward(120)
    my_turtle.right(90)
    my_turtle.forward(120)
    my_turtle.right(90)
    my_turtle.forward(120)
    my_turtle.right(90)
    # Move turtle to draw the roof.
    my_turtle.penup()
    my_turtle.forward(130)
    my_turtle.pendown()
    my_turtle.right(90)
    my_turtle.forward(120)
    my_turtle.left(135)
    my_turtle.forward(84.85)
    my_turtle.left(90)
    my_turtle.forward(84.85)

    #Move Turtle back to original position.
    my_turtle.penup()
    my_turtle.setposition(orgPosition)
    my_turtle.setheading(orgHeading)
    my_turtle.pendown()
Add this code to lab6p2.py and call it passing in fred. Note: We had to use Pythagorean Theorem in order to calculate the length of the roof.
Next, add windows and doors to the house function. Also, add two parameters to the function call to pass in an x and y coordinates of where to draw the left bottom corner of the house.
Create a new file/document in Thonny and save it locally with the file name lab6p3.py. Add the course header with the relevant information.
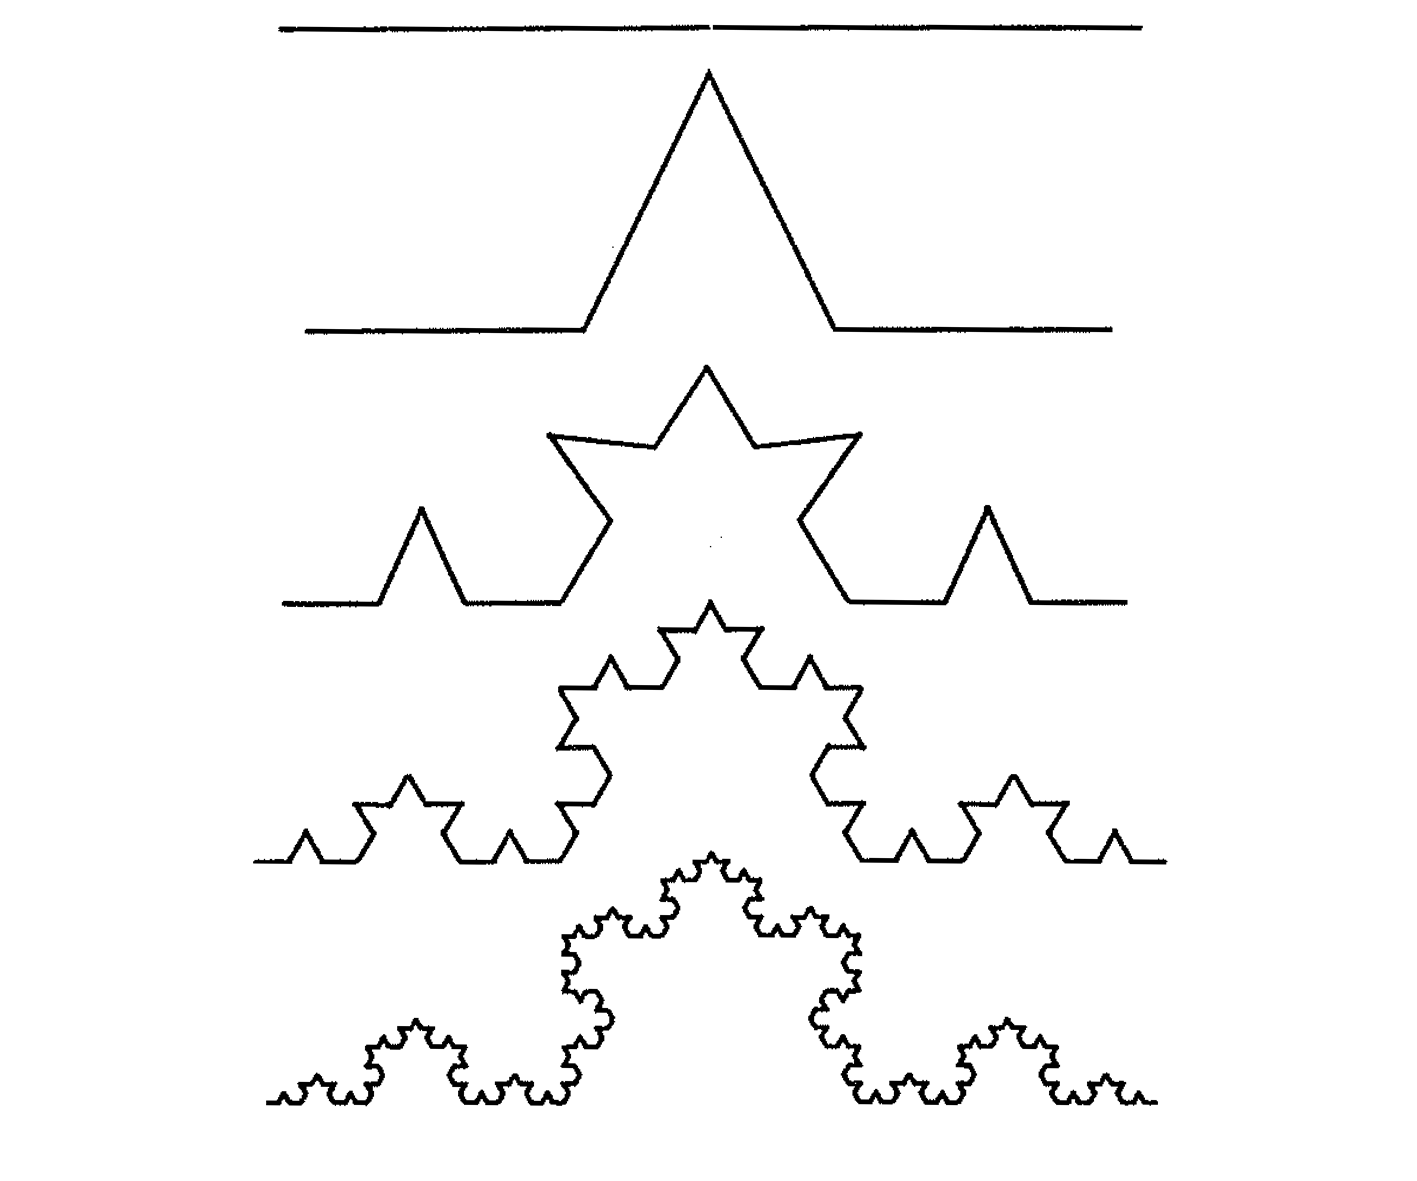
recursion… perhaps a Koch Curve?


The base case is just a straight line. To draw the next level:
- Draw a line 1/3 the total length
- Rotate 60 degrees to the left
- Draw another line 1/3 the total length
- Rotate 120 degrees to the right
- Draw a third line 1/3 the total length
- Rotate 60 degrees to the left
- Draw a fourth and final line 1/3 the total length
For each subsequent level, we simply take one of the “lines” and draw a shrunken copy of the procedure outlined above. Let’s code this up:
import turtle
def koch(t, order, size):
    if order == 0:                  # The base case is just a straight line
        t.forward(size)

    else:
        koch(t, order-1, size/3)    # koch-ify the 1st line
        t.left(60)                  # rotate 60deg to the left
        koch(t, order-1, size/3)    # koch-ify the 2nd line
        t.right(120)                # rotate 120deg to the right
        koch(t, order-1, size/3)    # koch-ify the 3rd line
        t.left(60)                  # rotate 60deg to the left
        koch(t, order-1, size/3)    # koch-ify the 4th line

def main():
    fred = turtle.Turtle()
    window = turtle.Screen()
    fred.color("blue")
    # We'll need to move Fred over to the left to start
    fred.penup()
    fred.backward(150)
    fred.pendown()
    # Call the koch procedure to start drawing
    koch(fred, 3, 300)
main()
Try changing the level (the \(2^{nd}\) parameter) to a different number and see what happens!
Answer the following question in your lab6SA.txt file:
- SA Question #4: Which level(s) did you set for the Koch Curve?
- SA Question #5: How do we know that this program is recursive?
Lab Submission
- For this lab you need to submit your programs via Moodle. Go to our Moodle Page and submit your
lab6SA.txt,lab6p1.py,lab6p2.py, andlab6p3.pyfiles.